
Customer Service:
Who We Are:
follow us:


join our mailing list:


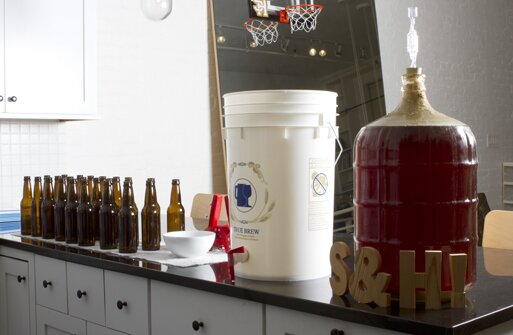
As you ASSScend up the famed steps of A.S.S.S. Beer's* storied process, you've now reached the bottling stage. This post is intended to keep you in line with the short (but important) stage of home brewing. You've made your wort, you've pitched your yeast, and now you've got flat A.S.S.S Beer. Take a look below (definitely watch the instructional video) and make sure EVERYTHING is sanitized. You're just 2 short weeks away from liquid glory.
*A.S.S.S Beer is a homebrew pASSSion project created by Allison Sires of Thomas Sires and Sam Shipley of Shipley & Halmos. They reside in artisinal-A.S.S.S Brooklyn (yeah, we know).
WHAT YOU'VE CREATED:
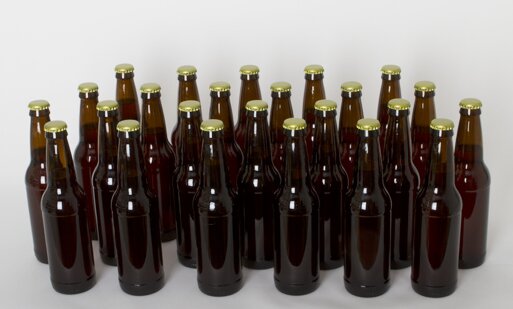
An English-style IPA (India Pale Ale) at around 6.0% alcohol by volume. You should have yielded about 2 cases of 12 oz. beers. Now it’s time to bottle 'em up for you and your crew to enjoy on any given Saturday afternoon. (Don’t worry, spring is coming!)
ITEMS YOU'LL NEED:
-12 oz. bottles (48 of them) for a typical 5-gallon batch of beer
-Fermented wort
-Bottle brush
-Sanitizer
-Priming sugar
-Bottling bucket
-Tubing
-Bottle filler
-Bottle caps
-Bottle capper
-Paper towels
Note: Some of the equipment and materials used in the original brewing process should be kept handy and will be used in the bottling process.
BOTTLIN' TIME:
Before you get going, carefully read through the below instructions to familiarize yourself with the process. We know you’re anxious to bottle (and eventually drink), but a little prep time will save a potential mistake down the line…
1. Boil 2 cups of water with the 4 oz. of corn sugar. Allow this solution to cool to 70º F.
2. Fill the bottling bucket with sanitizer, and put the tubing in the bucket to be sanitized for later use. Attach your bottle filler to the spigot and fill your bottles half way with sanitizer. Shake them up so you get the whole bottle wet with sanitizer.
3. Remove the bottle filler, and put it somewhere sanitized, like a ceramic plate with sanitizer on it. Make sure the spigot is closed. Now dump out the rest of the sanitizer from the bucket and the bottles. Don’t worry if some foam is left over.
4. Pour some sanitizer in a bowl and soak your bottle caps in it. You’ll use these later.
5. Gently pour the corn sugar solution into the sanitized bottling bucket.
6. Attach the sanitized tubing to the fermenter spigot. Gently transfer the beer to the sanitized bottle bucket (with the corn sugar solution already in it) using the sanitized tubing. Do not let beer splash. This will require a little touch, which we think you can handle.
7. Transfer all of the beer, but leave the muck at the bottom of the fermenter. This stuff is called Trub. If a little gets in the bottling bucket, not a huge worry. But stop transferring when you see that begin to happen.
8. Attach the bottle filler to the spigot on the bottling bucket. Fill the already sanitized bottles to top off each bottle. When you pull the bottle out of the bottle filler it will leave a small space at the top of the bottle. That’s what you want. Also, FYI, you might want to have a pot under the bottle being filled because leftover foam from the sanitizer might spill over the top of the bottle.
9. Put a sanitized cap on the bottle, center your capper over the bottle, and push both handles all the way down. Then pull the handles all the way up. Do this for all the bottles.
10. Let filled bottles sit at 65-75º F in a dark place for two weeks.
11. After that, chill the beers in your fridge for a couple days. Once it comes time to drink, we suggest pouring the beers into a proper glass instead of drinking directly out of the bottle. Careful not to pour any yeast sediment from the bottom of the bottle.![]()
Read "Bitter A.S.S.S. Beer - Part One" here.

S&H x PHILIP CRANGI CLASS RING$395.00 |

BEER SLEEVE$2.50 |

When creating a picture one of the most important decisions is what color to choose. You have two options, you can choose the local color... more »
The most concise and comprehensive compilation of everything one could ever want to know about the Shipley & Halmos brand... more »
Here you are considering stepping into the void of printed shirts. There are too many clichéd jokes here to make about why you may be afraid.... more »

Watch any game during the NCAA tournament, and you'll be impressed by the skills of some guy you've never heard of who's nailing threes, dominating the paint, controlling the tempo... more »

Just like when McD's hits us with the McRib, the bighead hoops are back. This time featuring three iconic college players... more »

As you may know, Sam and Jeff launched S&H (in 2008) with the goal of creating not just a clothing collection, but a wide array of products that... more »

The Grizzly Bear drummer talks Rubik's cubes, creepers and attempting the world's longest drumroll (He'd rather not). more »

For Spring 13, the we named the collection, "The Unknown Artist." It was a way to give a credit to those whose work inspires our everyday more »